WordPress has an incredibly simple AJAX pattern that works quite well for pretty much all use-cases. In this particular example, a contact form, I’ll show you how to write the HTML, PHP, and JavaScript (using jQuery). I’ll also show you how to look at this task from the high-level view, thinking about things as if we are also a project manager.
Note: This article assumes that you have basic understanding of HTML, PHP, JavaScript, and WordPress theming. Also, you’ll want to have knowledge of and access to ftp/sftp. If you do not, but you would like assistance, please feel free to send me a contact message!
So, lesson #1 in building anything is to clearly write down what exactly it is that we want to do. Using specific “user stories,” we can determine the specific tasks that will be needed to achieve success.
To begin, let’s describe what we want for the visitor:
User Stories
- The visitor should be able to visit my contact page.
- The visitor should be able to contact me with their name, email address, and a message.
- The visitor should not be able to give poorly formatted information to my contact message. (e.g., bad email address, no message given, etc.)
For most blogs, this is a simple-enough approach. We dont need to worry about dropdown menus with different subjects, checkboxes, etc. The important take-away from this article is the understanding of how WordPress handles AJAX requests.
Now that we know our general user stories, we can begin to write down some tasks that we need to get done:
- Create a custom page template and content template.
- Create a contact page as the WordPress Admin.
- Write the custom form HTML.
- Write the AJAX form event handler using jQuery’s $.ajax method.
- Register a WordPress AJAX event “controller” in the functions.php file.
- Sit back and relax, because you are awesome.
Create a Custom Page Template and Content Template
The very first thing we’ll want to do is create a custom page template. This will be where we put the form’s HTML and JS. The path for your custom template should be something like: wp-content/themes/your-current-theme/page-contact.php
So, create that file and add it to your theme. I chose to name it “page-contact.php” because of how WP’s template hierarchy works. WP will automatically pick up the template because I will be naming the page, “Contact.”
I’m customizing this great free theme that I’m using, Scrawl. Here’s what my custom page template code looks like:
<?php
// Template Name: Contact Page
get_header();
?>
    <div id="primary" class="content-area">
        <main id="main" class="site-main" role="main">
            <?php while (have_posts()) : the_post() ?>
            <?php get_template_part('content', 'contact') ?>
            <?php endwhile ?>
        </main>
    </div>
<?php get_footer() ?>
Take note of get_template_part(‘content’, ‘contact’). As you should know, being familiar with WordPress templating, this is pointing towards a content-contact.php file. That’s where the form HTML and jQuery will go. Let’s see that file now, before it has the really good stuff:
<article id="post-<?php the_ID() ?>" <?php post_class() ?>
    <header class="entry-header">
        <?php the_title('<h1 class="entry-title">', '</h1>') ?>
    </header>
    <div class="entry-content">
    <!-- THIS IS WHERE THE FORM HTML WILL GO -->
    </div>
    <!-- THIS IS WHERE WE WILL PLACE THE AJAX -->
</article>
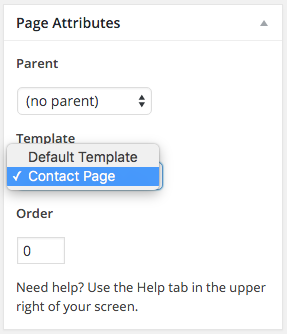
Create a Contact Page and Assign The New Custom Page Template
This shouldn’t take much explanation, but we’ll cover it here, anyways. First, log in as your blog administrator. Then, go to “Add New Page” (the url will look like “www.yourwpsite.com/wp-admin/post-new.php?post_type=page”). Enter the desired name of your contact page, select the new page template from the dropdown list, then click “Publish.”
Write the Form HTML
<form id="contact-form">
    <input type="hidden" name="action" value="contact_send" />
    <input type="text" name="name" placeholder="Your name..." />
    <input type="email" name="email" placeholder="Your email..." />
    <textarea name="message" placeholder="Your message..."></textarea>
    <input type="submit" value="Send Message" />
</form>
Take note of the hidden action form input. That value ties in directly to the functions.php AJAX handler we’ll write soon.
Write a jQuery $.ajax Submit Event Handler
<script type="text/javascript">
jQuery(document).ready(function ($) {
    var is_sending = false,
    failure_message = 'Whoops, looks like there was a problem. Please try again later.';

    $('#contact-form').submit(function (e) {
        if (is_sending || !validateInputs()) {
        return false; // Don't let someone submit the form while it is in-progress...
    }
    e.preventDefault(); // Prevent the default form submit
    var $this = $(this); // Cache this
    $.ajax({
        url: '<?php echo admin_url("admin-ajax.php") ?>', // Let WordPress figure this url out...
        type: 'post',
        dataType: 'JSON', // Set this so we don't need to decode the response...
        data: $this.serialize(), // One-liner form data prep...
        beforeSend: function () {
            is_sending = true;
            // You could do an animation here...
        },
        error: handleFormError,
        success: function (data) {
            if (data.status === 'success') {
                // Here, you could trigger a success message
            } else {
                handleFormError(); // If we don't get the expected response, it's an error...
            }
        }
        });
    });

    function handleFormError () {
        is_sending = false; // Reset the is_sending var so they can try again...
        alert(failure_message);
    }

    function validateInputs () {
        var $name = $('#contact-form > input[name="name"]').val(),
        $email = $('#contact-form > input[name="email"]').val(),
        $message = $('#contact-form > textarea').val();
        if (!$name || !$email || !$message) {
            alert('Before sending, please make sure to provide your name, email, and message.');
            return false;
        }
        return true;
    }
});
</script>
Write the WP AJAX Controller Actions
Now, let’s write the back-end piece that will communicate with the AJAX. Nothing too special here. Just some basic validation, and making use of wp_mail.
function sendContactFormToSiteAdmin () {
    try {
        if (empty($_POST['name']) || empty($_POST['email']) || empty($_POST['message'])) {
            throw new Exception('Bad form parameters. Check the markup to make sure you are naming the inputs correctly.');
        }
        if (!is_email($_POST['email'])) {
            throw new Exception('Email address not formatted correctly.');
        }

        $subject = 'Contact Form: '.$reason.' - '.$_POST['name'];
        $headers = 'From: My Blog Contact Form <contact@myblog.com>';
        $send_to = "my@contactemail.com";
        $subject = "MyBlog Contact Form ($reason): ".$_POST['name'];
        $message = "Message from ".$_POST['name'].": \n\n ". $_POST['message'] . " \n\n Reply to: " . $_POST['email'];

        if (wp_mail($send_to, $subject, $message, $headers)) {
            echo json_encode(array('status' => 'success', 'message' => 'Contact message sent.'));
            exit;
        } else {
            throw new Exception('Failed to send email. Check AJAX handler.');
        }
    } catch (Exception $e) {
        echo json_encode(array('status' => 'error', 'message' => $e->getMessage()));
        exit;
    }
}
add_action("wp_ajax_contact_send", "sendContactFormToSiteAdmin");
add_action("wp_ajax_nopriv_contact_send", "sendContactFormToSiteAdmin");
Take note of wp_ajax_contact_send and wp_ajax_nopriv_contact_send. The action name for each AJAX call is formatted like wp_ajax_{action_name}.
Wrapping Up
Okay, so we’ve got two new files: page-content.php, content-contact.php and we’ve added our AJAX PHP handler to the functions.php file.
That essentially covers the basics! As you can see from the code, you’ll need to make some personalized changes. We don’t really care about adding a nonce in this case because we aren’t storing the data in any way… But, if you do plan on using this pattern to interact with any data store, make sure to use a nonce.
Here’s the final version of the file that has the form and the js combined:
<article id="post-<?php the_ID() ?>" <?php post_class() ?>

    <header class="entry-header">
        <?php the_title('<h1 class="entry-title">', '</h1>') ?>
    </header>

    <div class="entry-content">
        <form id="contact-form">
            <input type="hidden" name="action" value="contact_send" />
            <input type="text" name="name" placeholder="Your name..." />
            <input type="email" name="email" placeholder="Your email..." />
            <textarea name="message" placeholder="Your message..."></textarea>
            <input type="submit" value="Send Message" />
        </form>
    </div>

    <script type="text/javascript">
        jQuery(document).ready(function ($) {
            var is_sending = false,
            failure_message = 'Whoops, looks like there was a problem. Please try again later.';

            $('#contact-form').submit(function (e) {
                if (is_sending || !validateInputs()) {
                    return false; // Don't let someone submit the form while it is in-progress...
                }
                e.preventDefault(); // Prevent the default form submit
                $this = $(this); // Cache this
                $.ajax({
                    url: '<?php echo admin_url("admin-ajax.php") ?>', // Let WordPress figure this url out...
                    type: 'post',
                    dataType: 'JSON', // Set this so we don't need to decode the response...
                    data: $this.serialize(), // One-liner form data prep...
                    beforeSend: function () {
                        is_sending = true;
                        // You could do an animation here...
                    },
                    error: handleFormError,
                    success: function (data) {
                        if (data.status === 'success') {
                            // Here, you could trigger a success message
                        } else {
                            handleFormError(); // If we don't get the expected response, it's an error...
                        }
                    }
                });
            });

            function handleFormError () {
                is_sending = false; // Reset the is_sending var so they can try again...
                alert(failure_message);
            }

            function validateInputs () {
                var $name = $('#contact-form > input[name="name"]').val(),
                $email = $('#contact-form > input[name="email"]').val(),
                $message = $('#contact-form > textarea').val();
                if (!$name || !$email || !$message) {
                    alert('Before sending, please make sure to provide your name, email, and message.');
                    return false;
                }
                return true;
            }
        });
    </script>

</article>
One last thing… There’s always more than one way to code these things. This is just a pattern that I find easy. If you have any feedback, find errors, or anything of that nature, please feel free to leave me a comment! Good luck, and hopefuly this article helps!
This is the first WordPress AJAX tutorial which actually worked for me. Your writing is very clear, and I really like the use of page templates. I don’t worry too much about separation of concerns in WordPress – all the stuff for my form is in one place, which is awesome. Thank you dearly for this.
hi this is super but it not working pls do any thing
Hello,
I’ve try it and it’s not working. But thanks anyway for your time.
Just two questions.
$reason stands for what ? I don’t see anything related to this variable…
Have a nice day/night
I always show an alert “Whoops, looks like there was a problem. Please try again later.”;
using wp latest version.
this works, but it does not give “success” or “error”. the email is sent, but no message that so has been done.